










































New to KubeDB? Please start here.
Memcached Alerting with Prometheus
This tutorial shows you how to configure Prometheus-based alerting for a KubeDB-managed Memcached instance using the memcached-alerts Helm chart. This chart also bundles a Grafana dashboard that it imports automatically through a post-install Job — no separate dashboard chart is required.
Before You Begin
Ensure you have a Kubernetes cluster and that
kubectlis configured to communicate with it. If you do not already have a cluster, you can create one using kind.Install the KubeDB operator by following the steps here.
Deploy the database in the
demonamespace:$ kubectl create ns demo namespace/demo createdTo learn more about how Prometheus monitoring works with KubeDB, see the overview here.
You will also need a Grafana API key / token with Editor permission so the chart’s dashboard-import Job can push the dashboard. See Step 1 below.
Note: YAML files used in this tutorial are stored in docs/examples/memcached folder in GitHub repository kubedb/docs.
Configuration
Step 1 (
kube-prometheus-stack) is required to follow this tutorial. Step 2 (Panopticon) is required for the Provisioner Group alerts below (KubeDBMemcachedPhase...) — skip it only if you just want the exporter-based Database Group alerts. If you have already completed the step(s) you need in another guide, skip ahead.
Step 1: Deploy kube-prometheus-stack
kube-prometheus-stack installs Prometheus, Prometheus Operator, Alertmanager, and Grafana together. This is the recommended way to get the full monitoring stack on Kubernetes.
Add the prometheus-community Helm repo and install:
$ helm repo add prometheus-community https://prometheus-community.github.io/helm-charts
$ helm repo update

$ helm upgrade --install prometheus prometheus-community/kube-prometheus-stack \
  --namespace monitoring --create-namespace \
  --set grafana.image.tag=7.5.5
Wait for all pods to be ready:
$ kubectl get pods -n monitoring
NAME                                                   READY   STATUS    RESTARTS   AGE
alertmanager-prometheus-kube-prometheus-alertmanager-0 2/2     Running   0          2m
prometheus-grafana-xxxx                                3/3     Running   0          2m
prometheus-kube-prometheus-operator-xxxx               1/1     Running   0          2m
prometheus-kube-prometheus-prometheus-0                2/2     Running   0          2m
prometheus-kube-state-metrics-xxxx                     1/1     Running   0          2m
Find the serviceMonitorSelector/ruleSelector labels that Prometheus uses to pick up ServiceMonitor/PrometheusRule objects — this is the release: prometheus label used throughout this tutorial.
$ kubectl get prometheus -n monitoring -o jsonpath='{.items[0].spec.ruleSelector}'
{"matchLabels":{"release":"prometheus"}}

$ kubectl get prometheus -n monitoring -o jsonpath='{.items[0].spec.serviceMonitorSelector}'
{"matchLabels":{"release":"prometheus"}}
Step 2: Install Panopticon (required for the Provisioner Group alerts)
Panopticon is the Appscode operator that exports the KubeDB operator’s own view of every resource — kubedb_com_memcached_status_phase and related metrics. It’s what powers the Provisioner Group alerts below (KubeDBMemcachedPhaseNotReady/KubeDBMemcachedPhaseCritical). Skip this step if you only need the exporter-based Database Group alerts.
$ helm repo add appscode https://charts.appscode.com/stable/
$ helm repo update

$ helm upgrade --install panopticon appscode/panopticon \
  --version v2026.4.30 \
  --namespace kubeops --create-namespace \
  --set monitoring.enabled=true \
  --set monitoring.agent=prometheus.io/operator \
  --set monitoring.serviceMonitor.labels.release=prometheus \
  --set-file license=/path/to/kubedb-license.txt \
  --wait --timeout 5m0s
Verify Panopticon is running:
$ kubectl get pods -n kubeops
NAME                          READY   STATUS    RESTARTS   AGE
panopticon-xxxx               1/1     Running   0          1m
Overview

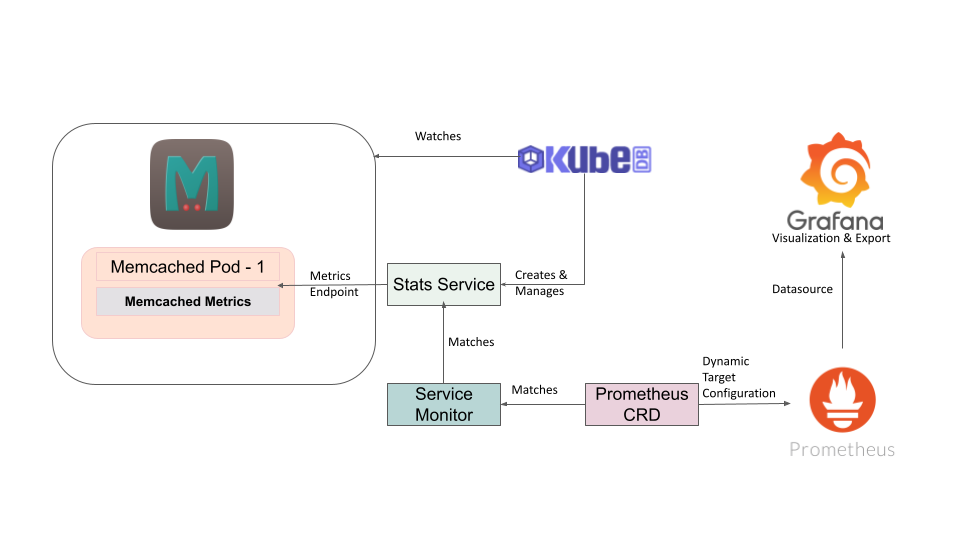
- KubeDB deploys Memcached with a built-in exporter sidecar that exposes metrics on port
56790. - ServiceMonitor (named
{memcached-name}-stats) is created automatically by KubeDB and tells Prometheus to scrape the exporter every 10 seconds. - PrometheusRule is created by the
memcached-alertschart and contains all Memcached alert definitions grouped by concern: database health, provisioner, and ops-manager. - Dashboard-import Job — when
grafana.enabledistrue, the chart also creates a one-shotJobthatPOSTs a bundled dashboard JSON straight to your Grafana instance’s/api/dashboards/importendpoint. - Prometheus Operator evaluates every rule expression every 30 seconds and fires matching alerts to AlertManager.
- AlertManager groups, inhibits, and silences alerts, then routes them to configured receivers (Slack, email, PagerDuty, webhook, etc.).
Deploy Memcached with Monitoring Enabled
At first, let’s deploy a Memcached database with monitoring enabled. Below is the Memcached object we are going to create.
apiVersion: kubedb.com/v1
kind: Memcached
metadata:
  name: mc-alert-demo
  namespace: demo
spec:
  replicas: 1
  version: "1.6.40"
  deletionPolicy: WipeOut
  monitor:
    agent: prometheus.io/operator
    prometheus:
      serviceMonitor:
        interval: 10s
        labels:
          release: prometheus
Here,
spec.monitor.agent: prometheus.io/operatortells KubeDB to create aServiceMonitorresource managed by the Prometheus operator.spec.monitor.prometheus.serviceMonitor.labels.release: prometheusadds therelease: prometheuslabel to the createdServiceMonitor, matching the PrometheusserviceMonitorSelectorso the target is discovered automatically.
Let’s create the Memcached resource.
$ kubectl apply -f https://github.com/kubedb/docs/raw/v2026.7.10/docs/examples/memcached/monitoring/mc-alert-demo.yaml
memcached.kubedb.com/mc-alert-demo created
Now, wait for the database to go into Ready state.
$ kubectl get memcached -n demo mc-alert-demo
NAME            VERSION   STATUS   AGE
mc-alert-demo   1.6.40    Ready    30s
KubeDB creates a dedicated stats service with the -stats suffix for monitoring.
$ kubectl get svc -n demo --selector="app.kubernetes.io/instance=mc-alert-demo"
NAME                    TYPE        CLUSTER-IP     EXTERNAL-IP   PORT(S)     AGE
mc-alert-demo           ClusterIP   10.43.157.50   <none>        11211/TCP   30s
mc-alert-demo-pods      ClusterIP   None           <none>        11211/TCP   30s
mc-alert-demo-stats     ClusterIP   10.43.157.43   <none>        56790/TCP   30s
KubeDB also creates a ServiceMonitor that tells Prometheus where to scrape.
$ kubectl get servicemonitor -n demo
NAME                  AGE
mc-alert-demo-stats   30s
Verify that the ServiceMonitor carries the release: prometheus label so Prometheus discovers it.
$ kubectl get servicemonitor -n demo mc-alert-demo-stats \
    -o jsonpath='{.metadata.labels.release}'
prometheus
Step 1 — Create a Grafana API Key
The chart’s dashboard-import Job authenticates to Grafana with a bearer token, so create one first.
Grafana 9+: Administration → Service accounts → Add service account → role Editor → Add token. Copy the token.
Grafana 8.x and earlier (no Service Accounts UI, e.g. the bundled
kube-prometheus-stackGrafana 7.5.5): use the legacy API Keys endpoint instead:# Port-forward Grafana $ kubectl port-forward -n monitoring svc/prometheus-grafana 3000:80& # Retrieve the admin password $ kubectl get secret -n monitoring prometheus-grafana \ -o jsonpath='{.data.admin-password}' | base64 -d && echo # Create an API key with Editor role $ curl -s -X POST -H "Content-Type: application/json" \ -u admin:<grafana_password> \ http://localhost:3000/api/auth/keys \ -d '{"name":"memcached-alerts-demo","role":"Editor"}' # Note the returned "key" # Stop the port-forward $ kill %1
Either way, you end up with a bearer token to use as grafana.apikey below.
Step 2 — Install memcached-alerts
The memcached-alerts chart creates a PrometheusRule resource containing all Memcached alert definitions grouped by concern: database health, provisioner, and ops-manager.
Why the Helm release name matters
The chart derives the PromQL job/instance scoping (and the PrometheusRule name) from the Helm release name, not from a values field — so the release name must match the Memcached object’s name (mc-alert-demo) for the rules to be correctly scoped to this instance.
The chart’s default label is release: kube-prometheus-stack, so we must also override it at install time to match the Prometheus ruleSelector.
Install
$ helm upgrade -i mc-alert-demo oci://ghcr.io/appscode-charts/memcached-alerts \
    -n demo \
    --create-namespace \
    --version=v2026.7.14 \
    --set form.alert.labels.release=prometheus \
    --set grafana.enabled=true \
    --set grafana.url="http://prometheus-grafana.monitoring.svc:80" \
    --set grafana.apikey="<token-from-above>" \
    --set grafana.jobName=mc-alert-demo-stats \
    --set form.alert.appSuffix=mc-grafana-demo
| Flag | Value | Purpose |
|---|---|---|
mc-alert-demo (release name) | — | Scopes every PromQL expression to this instance (job="mc-alert-demo-stats") |
-n demo | demo | Installs the PrometheusRule in the same namespace as the database |
form.alert.labels.release | prometheus | Matches the Prometheus ruleSelector so the rules are loaded |
grafana.url | in-cluster Grafana URL | The dashboard-import Job runs inside the cluster, so this must be a cluster-internal address, not localhost |
grafana.apikey | token from Step 1 | Authenticates the dashboard-import POST request |
grafana.jobName | mc-alert-demo-stats | Required — the chart’s default (kubedb-databases) doesn’t match any real Prometheus job, so the dashboard’s panels show “No data” unless you override it to your instance’s actual stats-service name. (Note the dashboard title does not use this value — see below.) |
To install alerts only, without the dashboard, omit the
grafana.*flags (or set--set grafana.enabled=false).
Verify the PrometheusRule is created
$ kubectl get prometheusrule -n demo
NAME            AGE
mc-alert-demo   30s
Confirm the release: prometheus label is present.
$ kubectl get prometheusrule -n demo mc-alert-demo \
    -o jsonpath='{.metadata.labels.release}'
prometheus
Verify the dashboard-import Job
$ kubectl get job -n demo
NAME                  STATUS     COMPLETIONS   AGE
mc-alert-demo-post-job  Complete   1/1           17s

$ kubectl logs -n demo job/mc-alert-demo-post-job
{"pluginId":"","title":"kubedb.com / Memcached / demo / memcached","imported":true, ...}
A "imported":true response confirms the dashboard now exists in Grafana. Note the title is kubedb.com / Memcached / demo / memcached — this chart’s dashboard title is hardcoded in the bundled JSON and does not reflect your actual namespace/release name, unlike most other *-alerts charts. (In this tutorial the namespace genuinely is demo, so it happens to match here — but the release name mc-alert-demo still won’t appear in the title.)
Confirm Prometheus loaded the rules
Port-forward the Prometheus UI and open the Status → Rule health page.
$ kubectl port-forward -n monitoring \
    svc/prometheus-kube-prometheus-prometheus 9090:9090
Open http://localhost:9090/rules?search=memcached.
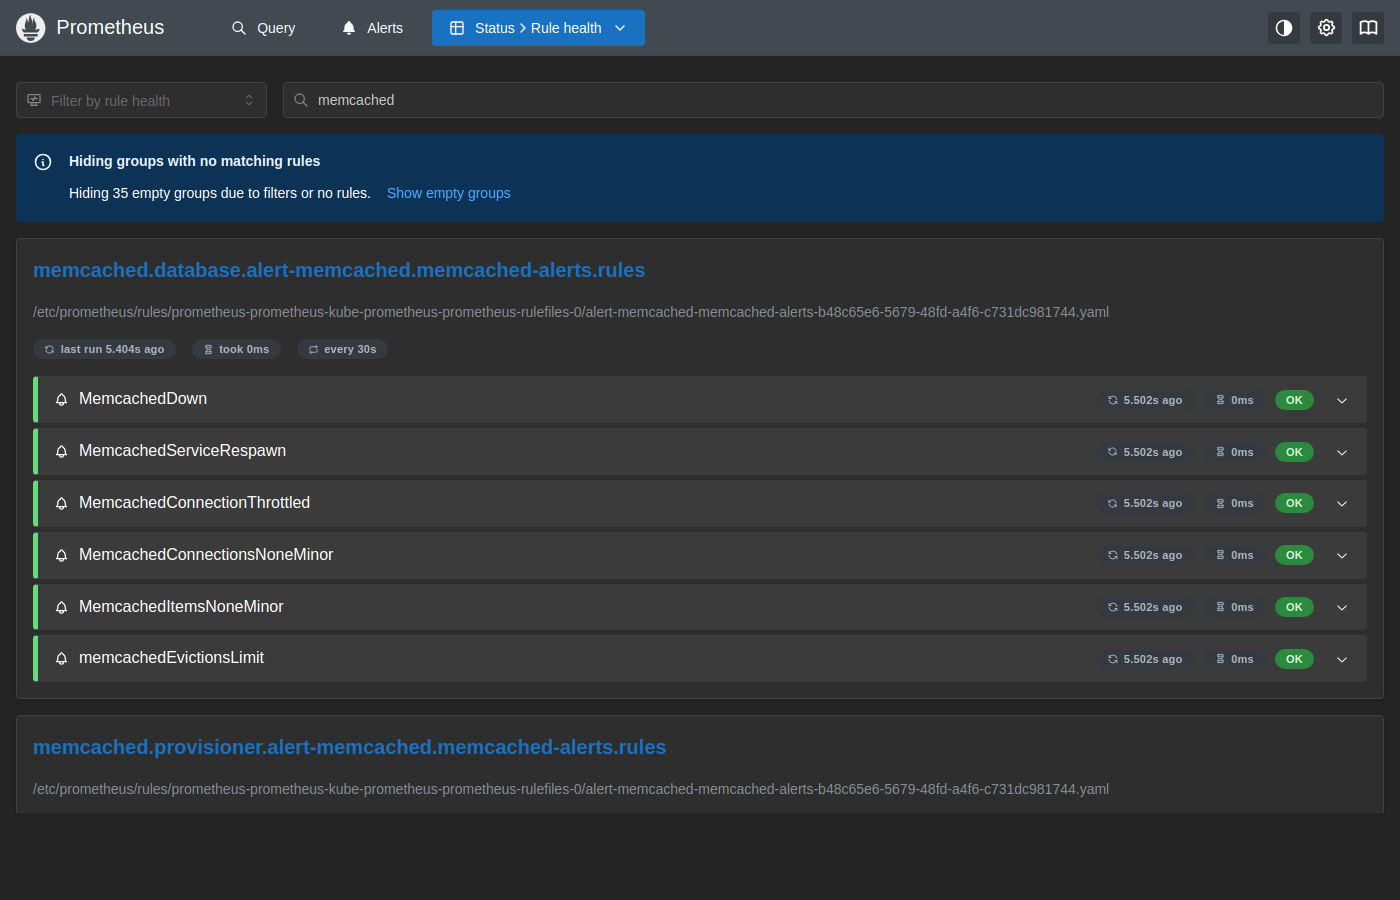
The memcached.database.demo.mc-alert-demo.rules group is visible with all rules showing OK, confirming that Prometheus has loaded and is evaluating the Memcached alert definitions every 30 seconds.
Verify End-to-End
1. Check the exporter is running
The exporter sidecar inside the Memcached pod serves metrics at :56790/metrics. A value of memcached_up 1 confirms the exporter can reach Memcached.
$ kubectl exec -n demo mc-alert-demo-0 -c exporter -- \
    wget -qO- localhost:56790/metrics | grep memcached_up
memcached_up 1
2. Check the Prometheus target is UP
Open http://localhost:9090/targets?search=mc-alert-demo.
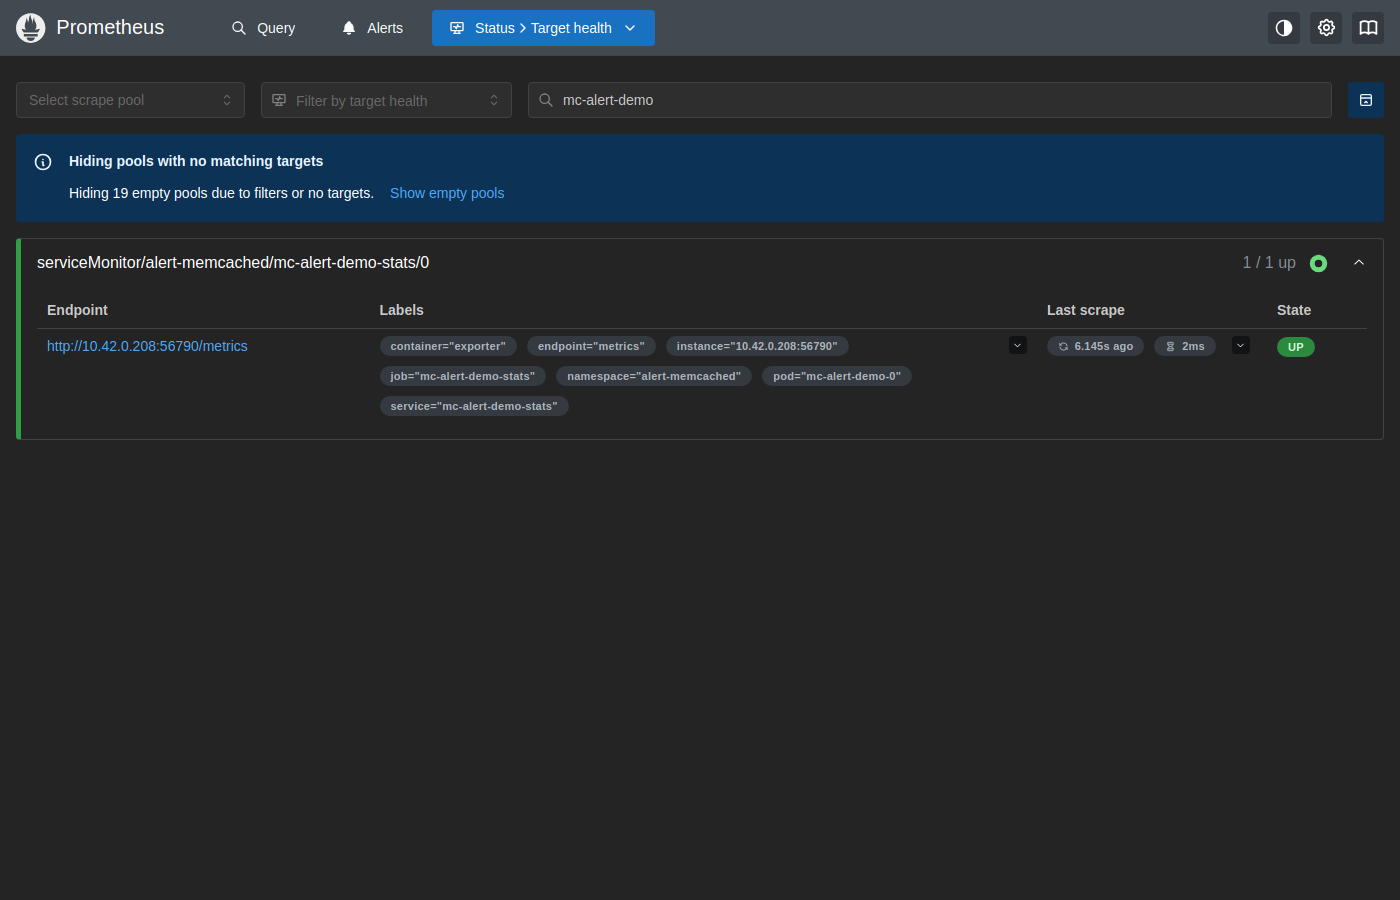
The target serviceMonitor/demo/mc-alert-demo-stats/0 shows UP, confirming metrics are being scraped from mc-alert-demo-0 in the demo namespace.
3. Confirm all Memcached alerts are inactive
Open http://localhost:9090/alerts?search=memcached to see the Memcached alert groups.
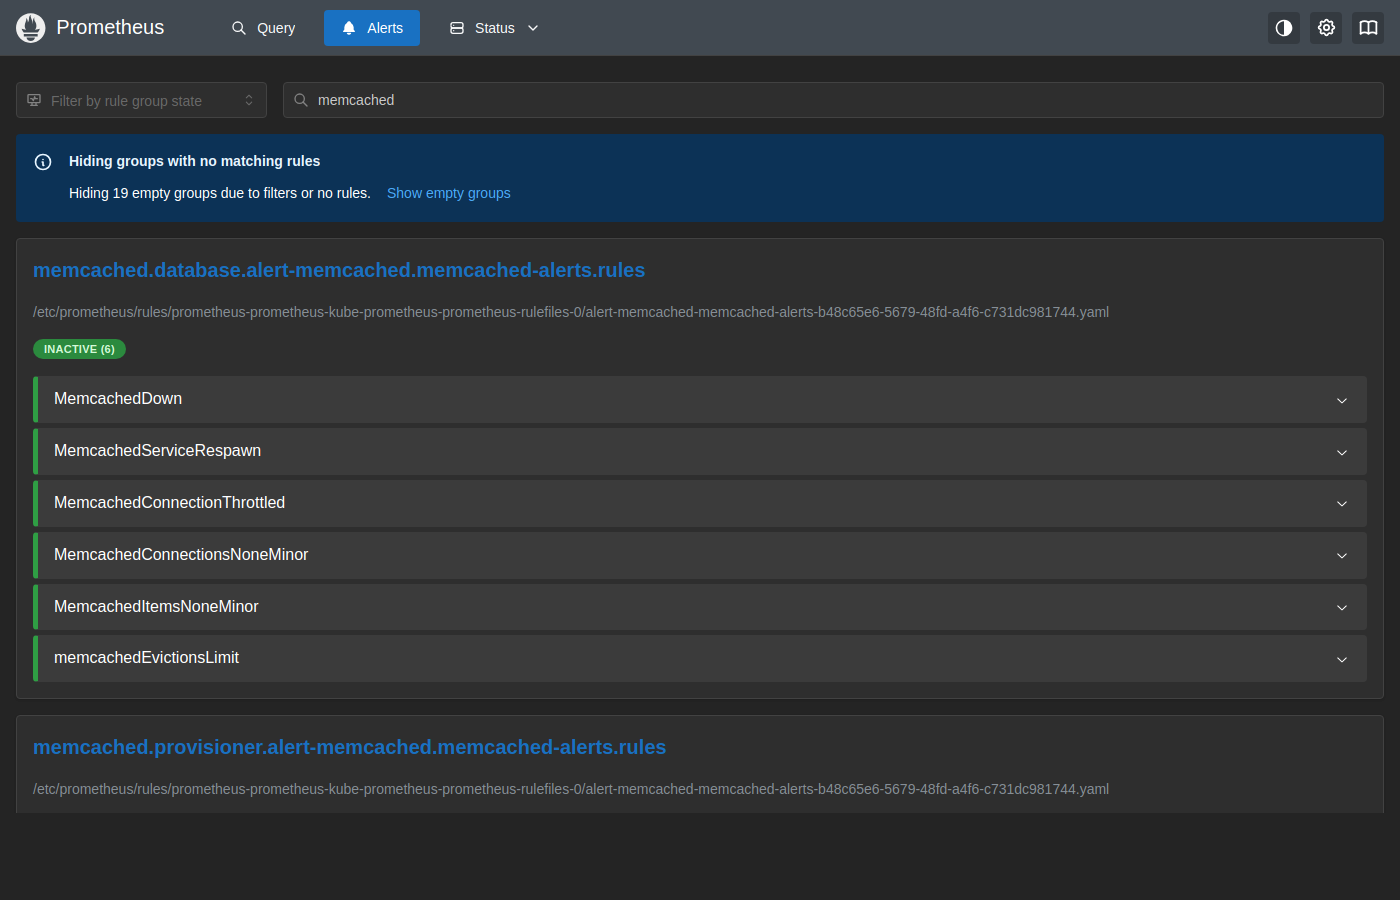
All 6 rules in the memcached.database group show INACTIVE (6), meaning the database is healthy and no thresholds are breached.
4. Check AlertManager
Port-forward AlertManager to view any currently firing alerts.
$ kubectl port-forward -n monitoring \
    svc/prometheus-kube-prometheus-alertmanager 9093:9093
Open http://localhost:9093. With a healthy Memcached instance, no alerts for mc-alert-demo will be listed here.
Simulating a Firing Alert
The previous section confirmed that all alerts are INACTIVE while the database is healthy. This section walks through deliberately triggering the MemcachedDown critical alert so you can observe the full alert lifecycle — from firing in Prometheus through to the AlertManager dashboard — and then resolve it.
1. Stop the Memcached process
Kill the memcached process inside the pod. This crashes the main container so the exporter sidecar can no longer reach it and reports memcached_up 0 on the next scrape, while Kubernetes restarts the crashed container in the background.
$ kubectl exec -n demo mc-alert-demo-0 -c memcached -- kill 1
Wait 30–60 seconds for the next Prometheus scrape cycle (configured at 10 s) and rule-evaluation cycle (30 s) to register the failure.
2. Watch the alert fire in Prometheus
Open http://localhost:9090/alerts?search=memcached.
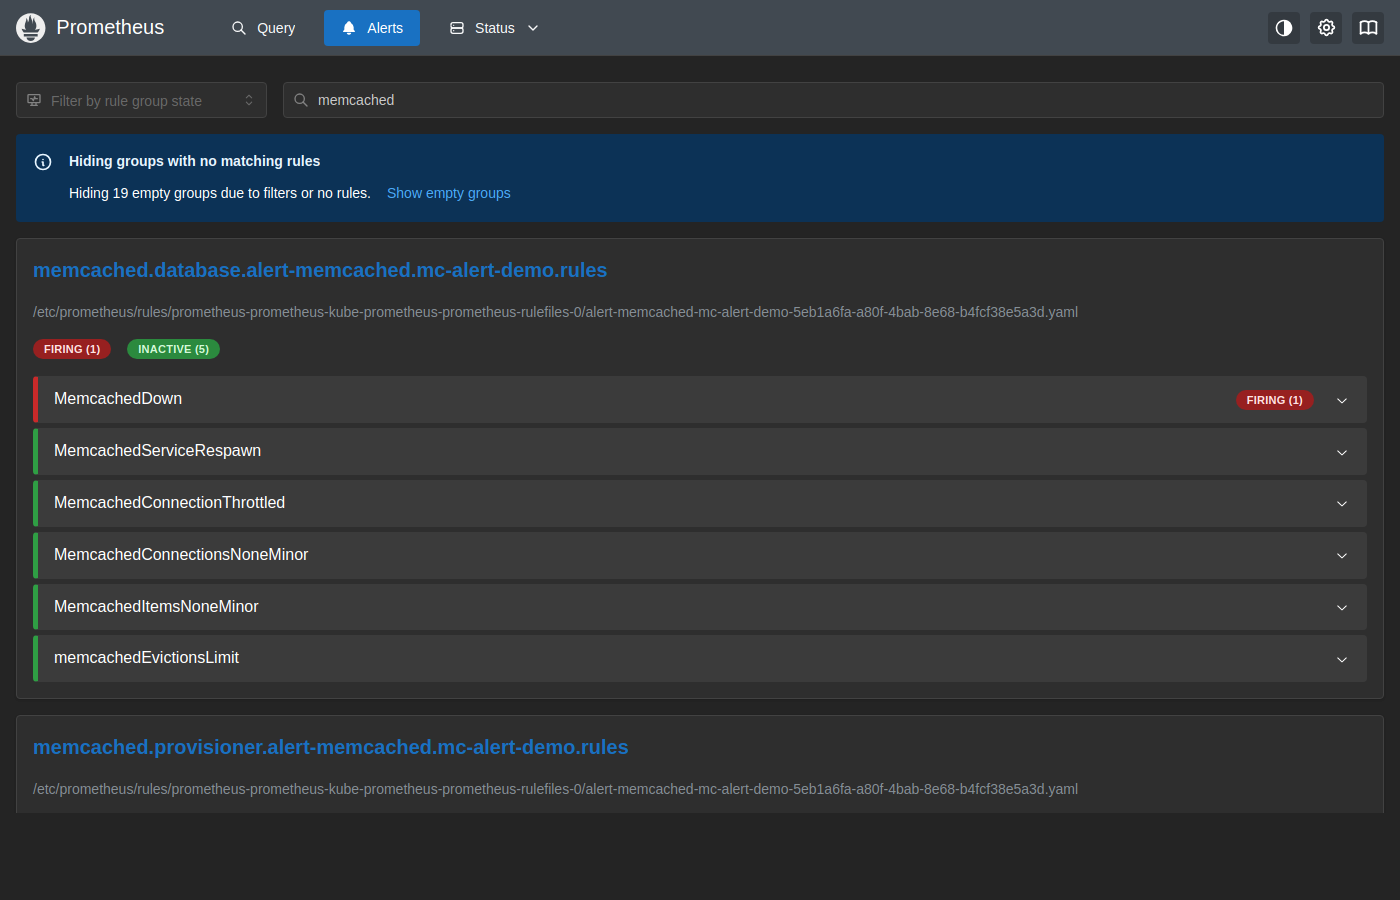
Because MemcachedDown has for: 0m (instant), it moves directly from INACTIVE to FIRING within one evaluation cycle.
3. Check the AlertManager dashboard
Open http://localhost:9093.
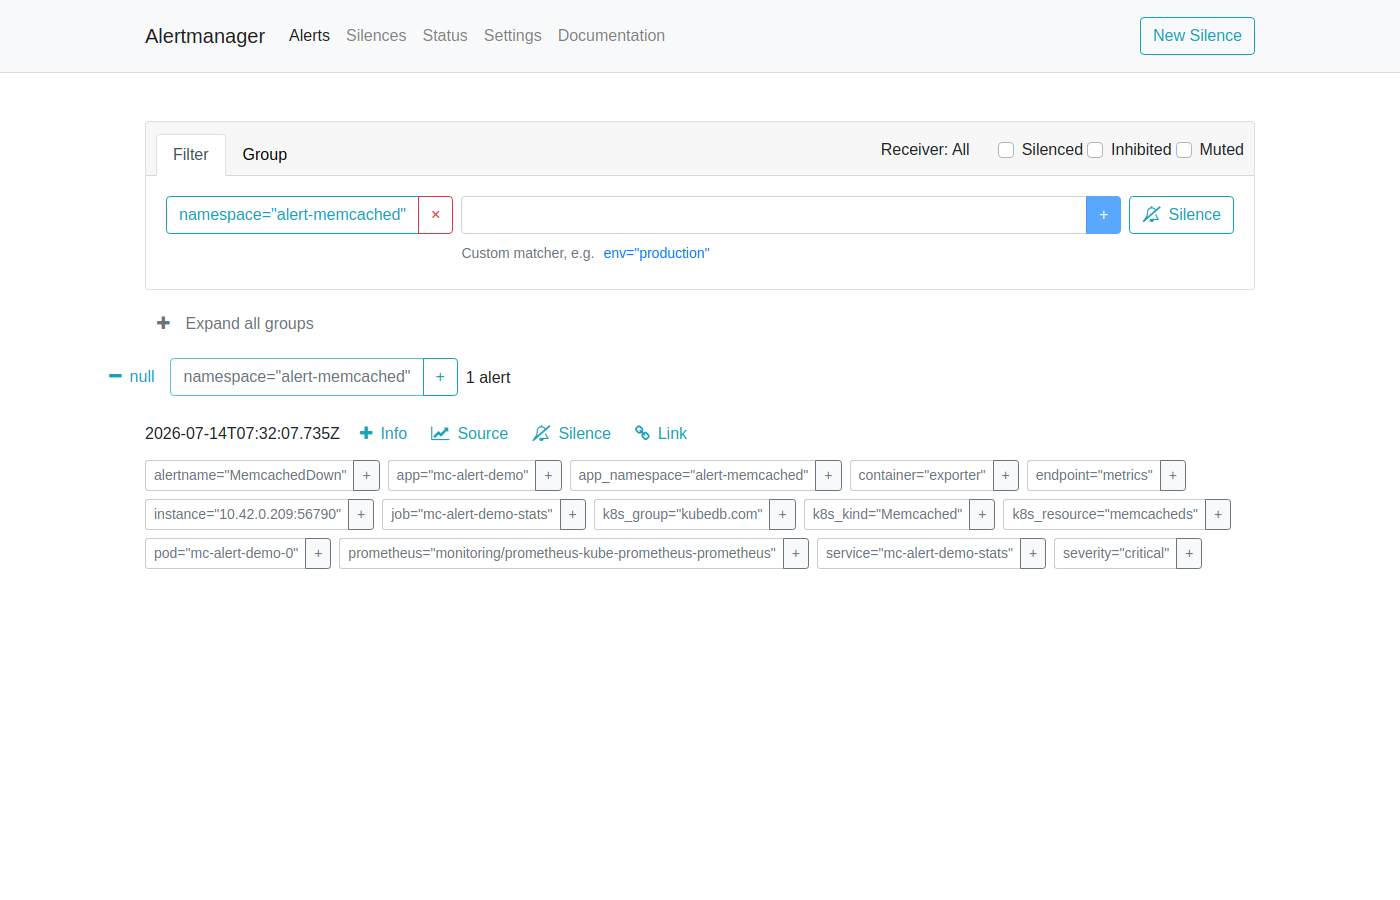
AlertManager shows the MemcachedDown alert. The alert card displays:
- Severity:
critical - Instance:
mc-alert-demo-0in thedemonamespace - job:
mc-alert-demo-stats - Started: timestamp when the alert first fired
AlertManager routes this alert to every receiver configured in your alertmanagerConfig (Slack, email, PagerDuty, webhook, etc.) based on your routing tree. If no receiver is configured, the alert is visible here but silently dropped.
4. Restore Memcached
Delete the pod so KubeDB recreates it cleanly.
$ kubectl delete pod -n demo mc-alert-demo-0
Once memcached_up returns to 1, Prometheus marks the alert INACTIVE again and AlertManager sends a resolved notification to all receivers.
Alert Reference
All alerts are scoped to the mc-alert-demo instance in the demo namespace via the PromQL label filters job="mc-alert-demo-stats" and namespace="demo".
Database Group
Fired based on live metrics from the Memcached exporter.
| Alert | Severity | For | What It Means |
|---|---|---|---|
MemcachedDown | critical | instant | Exporter cannot reach Memcached — instance is down or crashed. |
MemcachedServiceRespawn | critical | instant | Memcached restarted recently (uptime < 180s). |
MemcachedConnectionThrottled | warning | 2m | More than 10 connections were yielded/throttled in the last minute — client pool nearly exhausted. |
MemcachedConnectionsNoneMinor | warning | 2m | No open client connections — application may not be talking to this instance. |
MemcachedItemsNoneMinor | warning | 2m | Cache is empty — no items stored, possibly indicating a flush or misconfiguration. |
memcachedEvictionsLimit | critical | instant | More than 10 evictions — cache is undersized for the current workload. |
Provisioner Group
Monitors the KubeDB operator’s view of the Memcached resource phase.
| Alert | Severity | For | What It Means |
|---|---|---|---|
appPhaseNotReady | critical | 1m | KubeDB marked the Memcached resource NotReady — operator cannot reach the database. |
appPhaseCritical | warning | 15m | The instance is in a degraded/critical phase. |
OpsManager Group
Tracks MemcachedOpsRequest lifecycle during upgrades, scaling, and reconfiguration.
| Alert | Severity | For | What It Means |
|---|---|---|---|
opsRequestOnProgress | info | instant | An ops request is currently in progress. |
opsRequestStatusProgressingToLong | critical | 30m | An ops request has been running for 30+ minutes — likely stuck. |
opsRequestFailed | critical | instant | An ops request failed — check the OpsRequest object for the error. |
Customising Alerts
To override thresholds or disable specific alert groups, create a custom values file and upgrade the chart.
# custom-alerts.yaml
form:
  alert:
    labels:
      release: prometheus
    groups:
      database:
        enabled: warning
        rules:
          memcachedConnectionThrottled:
            enabled: true
            duration: "5m"
            val: 20        # fire at 20 throttled connections instead of the default 10
            severity: warning
      opsManager:
        enabled: "none"    # disable all ops-manager alerts
$ helm upgrade mc-alert-demo oci://ghcr.io/appscode-charts/memcached-alerts \
    -n demo \
    --version=v2026.7.14 \
    -f custom-alerts.yaml
Cleaning up
To remove all resources created in this tutorial, run the following commands.
# Remove the memcached-alerts release (PrometheusRule + dashboard-import Job)
$ helm uninstall mc-alert-demo -n demo

# Remove the imported Grafana dashboard (it is not removed by helm uninstall)
$ curl -s -X DELETE -H "Authorization: Bearer <grafana-token>" \
    http://localhost:3000/api/dashboards/uid/<uid>

# Remove the Memcached instance
$ kubectl delete memcached -n demo mc-alert-demo

# Delete namespace
$ kubectl delete ns demo

# Uninstall monitoring stack (optional — skip if other tutorials on this cluster still need them)
$ helm uninstall panopticon -n kubeops
$ helm uninstall prometheus -n monitoring
Next Steps
- Monitor your Memcached database with KubeDB using builtin Prometheus.
- Monitor your Memcached database with KubeDB using Prometheus operator.
- Use private Docker registry to deploy Memcached with KubeDB.
- Want to hack on KubeDB? Check our contribution guidelines.