










































New to KubeDB? Please start here.
Druid Alerting with Prometheus
This tutorial shows you how to configure Prometheus-based alerting for a KubeDB-managed Apache Druid instance using the druid-alerts Helm chart, and how to visualise live metrics using the kubedb-grafana-dashboards chart.
Before You Begin
Ensure you have a Kubernetes cluster and that
kubectlis configured to communicate with it. If you do not already have a cluster, you can create one using kind.Install the KubeDB operator by following the steps here, making sure to enable the
DruidandZooKeeperfeature gates.Deploy the database in the
alert-druidnamespace:$ kubectl create ns alert-druid namespace/alert-druid createdDruid requires an external deep storage backend (for storing segments) and a metadata storage database before it can become
Ready. This tutorial uses a MinIO tenant as S3-compatible deep storage, and lets KubeDB auto-provision a MySQL cluster for metadata storage. See the Druid Quickstart guide for the full walkthrough of setting these up — the short version is repeated in the Deploy section below.To learn more about how Prometheus monitoring works with KubeDB, see the overview here.
Note: YAML files used in this tutorial are stored in docs/guides/druid/monitoring/yamls folder in GitHub repository kubedb/docs.
Configuration
Step 1 (
kube-prometheus-stack) is required to follow this tutorial. Step 2 (Panopticon) is required for the Provisioner Group alerts below (KubeDBDruidPhase...) — skip it only if you just want the exporter-based Database Group alerts. If you have already completed the step(s) you need in another guide, skip ahead.
Step 1: Deploy kube-prometheus-stack
kube-prometheus-stack installs Prometheus, Prometheus Operator, Alertmanager, and Grafana together. This is the recommended way to get the full monitoring stack on Kubernetes.
Add the prometheus-community Helm repo and install:
$ helm repo add prometheus-community https://prometheus-community.github.io/helm-charts
$ helm repo update

$ helm upgrade --install prometheus prometheus-community/kube-prometheus-stack \
  --namespace monitoring --create-namespace \
  --set grafana.image.tag=7.5.5
Wait for all pods to be ready:
$ kubectl get pods -n monitoring
NAME                                                   READY   STATUS    RESTARTS   AGE
alertmanager-prometheus-kube-prometheus-alertmanager-0 2/2     Running   0          2m
prometheus-grafana-xxxx                                3/3     Running   0          2m
prometheus-kube-prometheus-operator-xxxx               1/1     Running   0          2m
prometheus-kube-prometheus-prometheus-0                2/2     Running   0          2m
prometheus-kube-state-metrics-xxxx                     1/1     Running   0          2m
Find the serviceMonitorSelector/ruleSelector labels that Prometheus uses to pick up ServiceMonitor/PrometheusRule objects — this is the release: prometheus label used throughout this tutorial.
$ kubectl get prometheus -n monitoring -o jsonpath='{.items[0].spec.ruleSelector}'
{"matchLabels":{"release":"prometheus"}}

$ kubectl get prometheus -n monitoring -o jsonpath='{.items[0].spec.serviceMonitorSelector}'
{"matchLabels":{"release":"prometheus"}}
Step 2: Install Panopticon (required for the Provisioner Group alerts)
Panopticon is the Appscode operator that exports the KubeDB operator’s own view of every resource — kubedb_com_druid_status_phase and related metrics. It’s what powers the Provisioner Group alerts below (KubeDBDruidPhaseNotReady/KubeDBDruidPhaseCritical). Skip this step if you only need the exporter-based Database Group alerts.
$ helm repo add appscode https://charts.appscode.com/stable/
$ helm repo update

$ helm upgrade --install panopticon appscode/panopticon \
  --version v2026.4.30 \
  --namespace kubeops --create-namespace \
  --set monitoring.enabled=true \
  --set monitoring.agent=prometheus.io/operator \
  --set monitoring.serviceMonitor.labels.release=prometheus \
  --set-file license=/path/to/kubedb-license.txt \
  --wait --timeout 5m0s
Verify Panopticon is running:
$ kubectl get pods -n kubeops
NAME                          READY   STATUS    RESTARTS   AGE
panopticon-xxxx               1/1     Running   0          1m
Overview

- KubeDB deploys Druid nodes (router, broker, coordinator, historical, middleManager, overlord) with a JMX Exporter Java agent running inside each Druid container, exposing Prometheus metrics on port
9104— unlike most other KubeDB databases which use a separate sidecar exporter container. - ServiceMonitor (named
{druid-name}-stats) is created automatically by KubeDB and tells Prometheus to scrape every Druid node’s exporter every 10 seconds. - PrometheusRule is created by the
druid-alertschart and contains all Druid alert definitions grouped by concern: database health and provisioner. - Prometheus Operator evaluates every rule expression every 30 seconds and fires matching alerts to AlertManager.
- AlertManager groups, inhibits, and silences alerts, then routes them to configured receivers (Slack, email, PagerDuty, webhook, etc.).
- Grafana visualises metrics through pre-built dashboards provisioned by the
kubedb-grafana-dashboardschart.
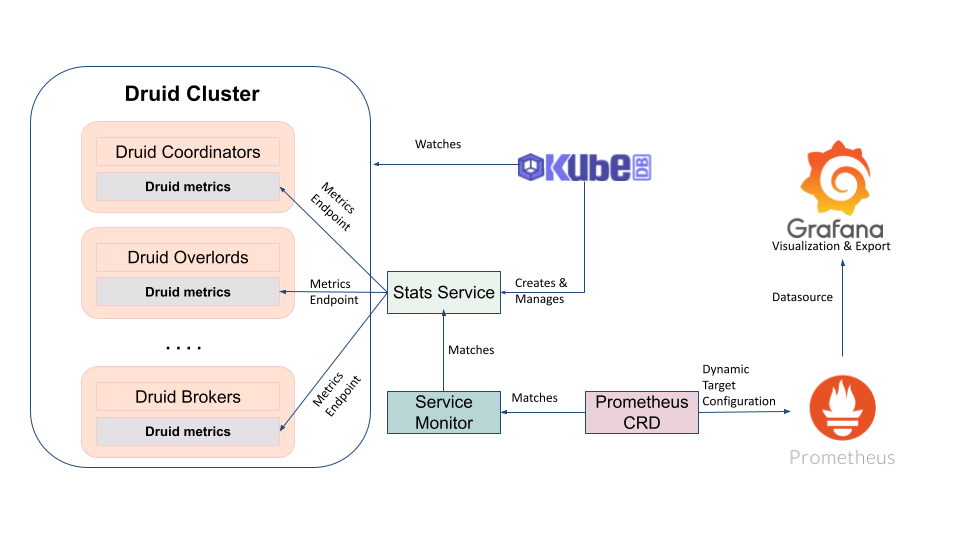
Deploy Druid with Monitoring Enabled
Prepare Deep Storage and Metadata Storage
Druid cannot start without a deep storage backend for segments. We install a MinIO tenant to provide S3-compatible storage in the same namespace as the database (the cluster-wide minio-operator must already be installed — helm upgrade --install minio-operator minio/operator -n minio-operator --create-namespace if it isn’t):
$ helm repo add minio https://operator.min.io/
$ helm repo update minio

$ helm upgrade --install --namespace alert-druid druid-minio minio/tenant \
    --set tenant.pools[0].servers=1 \
    --set tenant.pools[0].volumesPerServer=1 \
    --set tenant.pools[0].size=1Gi \
    --set tenant.certificate.requestAutoCert=false \
    --set tenant.buckets[0].name="druid" \
    --set tenant.pools[0].name="default"
Once the tenant pod is Running, note the headless service it creates (typically myminio-hl) and create the deep-storage-config Secret. The tenant’s root credentials live in the auto-created myminio-env-configuration Secret — kubectl get secret -n alert-druid myminio-env-configuration -o jsonpath='{.data.config\.env}' | base64 -d if you need to confirm them:
apiVersion: v1
kind: Secret
metadata:
  name: deep-storage-config
  namespace: alert-druid
stringData:
  druid.storage.type: "s3"
  druid.storage.bucket: "druid"
  druid.storage.baseKey: "druid/segments"
  druid.s3.accessKey: "minio"
  druid.s3.secretKey: "minio123"
  druid.s3.protocol: "http"
  druid.s3.enablePathStyleAccess: "true"
  druid.s3.endpoint.signingRegion: "us-east-1"
  druid.s3.endpoint.url: "http://myminio-hl.alert-druid.svc.cluster.local:9000/"
$ kubectl apply -f https://github.com/kubedb/docs/raw/v2026.7.10/docs/guides/druid/monitoring/yamls/deep-storage-config-alert-druid.yaml
secret/deep-storage-config created
KubeDB doesn’t require you to set up metadata storage yourself — if spec.metadataStorage is left unset, the operator automatically provisions a dedicated MySQL cluster (3 replicas, for group-replication quorum) and a ZooKeeper ensemble (3 replicas) for cluster coordination. This means the Druid object stays in the Provisioning phase for several minutes on first deploy while these dependencies come up — this is expected, not a stuck deployment. In testing, the MySQL + ZooKeeper dependencies alone took about 6 minutes to reach Ready before Druid’s own node pods even started, and the Druid image (~1 GB) took a further 4-5 minutes to pull on first use — budget 10-15 minutes for a completely fresh cluster with nothing cached yet.
Deploy
Below is the Druid object we are going to create.
apiVersion: kubedb.com/v1alpha2
kind: Druid
metadata:
  name: druid-alert-demo
  namespace: alert-druid
spec:
  version: 28.0.1
  deepStorage:
    type: s3
    configSecret:
      name: deep-storage-config
  topology:
    routers:
      replicas: 1
  monitor:
    agent: prometheus.io/operator
    prometheus:
      serviceMonitor:
        labels:
          release: prometheus
        interval: 10s
  deletionPolicy: WipeOut
Here,
spec.monitor.agent: prometheus.io/operatortells KubeDB to create aServiceMonitorresource managed by the Prometheus operator.spec.monitor.prometheus.serviceMonitor.labels.release: prometheusadds therelease: prometheuslabel to the createdServiceMonitor, matching the PrometheusserviceMonitorSelectorso the target is discovered automatically.
Let’s create the Druid resource.
$ kubectl apply -f https://github.com/kubedb/docs/raw/v2026.7.10/docs/guides/druid/monitoring/yamls/druid-alert-demo.yaml
druid.kubedb.com/druid-alert-demo created
Now, wait for the database to go into Ready state.
$ kubectl get druid -n alert-druid druid-alert-demo -w
NAME               VERSION   STATUS         AGE
druid-alert-demo   28.0.1    Provisioning   30s
druid-alert-demo   28.0.1    Provisioning   9m50s
druid-alert-demo   28.0.1    Ready          15m
KubeDB brings up one pod per Druid node type, plus the auto-provisioned MySQL and ZooKeeper pods:
$ kubectl get pods -n alert-druid
NAME                                READY   STATUS    RESTARTS   AGE
druid-alert-demo-brokers-0          1/1     Running   0          15m
druid-alert-demo-coordinators-0     1/1     Running   0          15m
druid-alert-demo-historicals-0      1/1     Running   0          15m
druid-alert-demo-middlemanagers-0   1/1     Running   0          15m
druid-alert-demo-mysql-metadata-0   3/3     Running   0          21m
druid-alert-demo-mysql-metadata-1   3/3     Running   0          19m
druid-alert-demo-mysql-metadata-2   3/3     Running   0          17m
druid-alert-demo-routers-0          1/1     Running   0          15m
druid-alert-demo-zk-0               1/1     Running   0          21m
druid-alert-demo-zk-1               1/1     Running   0          18m
druid-alert-demo-zk-2               1/1     Running   0          17m
KubeDB creates a dedicated stats service with the -stats suffix for monitoring.
$ kubectl get svc -n alert-druid --selector="app.kubernetes.io/instance=druid-alert-demo"
NAME                            TYPE        CLUSTER-IP      EXTERNAL-IP   PORT(S)             AGE
druid-alert-demo-brokers        ClusterIP   10.43.205.182   <none>        8082/TCP            15m
druid-alert-demo-coordinators   ClusterIP   10.43.43.45     <none>        8081/TCP            15m
druid-alert-demo-pods           ClusterIP   None            <none>        8081/TCP,8090/TCP,8083/TCP,8091/TCP,8082/TCP,8888/TCP   15m
druid-alert-demo-routers        ClusterIP   10.43.88.220    <none>        8888/TCP            15m
druid-alert-demo-stats          ClusterIP   10.43.104.95    <none>        9104/TCP            15m
KubeDB also creates a ServiceMonitor that tells Prometheus where to scrape.
$ kubectl get servicemonitor -n alert-druid
NAME                     AGE
druid-alert-demo-stats   15m
Verify that the ServiceMonitor carries the release: prometheus label so Prometheus discovers it.
$ kubectl get servicemonitor -n alert-druid druid-alert-demo-stats \
    -o jsonpath='{.metadata.labels.release}'
prometheus
Step 1 — Install druid-alerts
The druid-alerts chart creates a PrometheusRule resource containing all Druid alert definitions grouped by concern: database health and provisioner.
Why the Helm release name matters
The chart derives the PromQL job/instance scoping (and the PrometheusRule name) from the Helm release name, not from a values field — so the release name must match the Druid object’s name (druid-alert-demo) for the rules to be correctly scoped to this instance.
The chart’s default label is release: kube-prometheus-stack, so we must also override it at install time to match the Prometheus ruleSelector.
Install
$ helm upgrade -i druid-alert-demo appscode/druid-alerts \
    -n alert-druid \
    --create-namespace \
    --version=v2026.7.14 \
    --set form.alert.labels.release=prometheus \
    --set form.alert.appSuffix=dr-grafana-demo
| Flag | Value | Purpose |
|---|---|---|
druid-alert-demo (release name) | — | Scopes every PromQL expression to this instance (service="druid-alert-demo-stats") |
-n alert-druid | alert-druid | Installs the PrometheusRule in the same namespace as the database |
form.alert.labels.release | prometheus | Matches the Prometheus ruleSelector so the rules are loaded |
This tutorial uses the separately-maintained
kubedb-grafana-dashboardschart for Grafana dashboards (see Step 2) rather than this chart’s own bundled dashboard-import option, since it ships ready-made Summary/Pod/Database dashboards for Druid.
Verify the PrometheusRule is created
$ kubectl get prometheusrule -n alert-druid
NAME               AGE
druid-alert-demo   30s
Confirm the release: prometheus label is present.
$ kubectl get prometheusrule -n alert-druid druid-alert-demo \
    -o jsonpath='{.metadata.labels.release}'
prometheus
Confirm Prometheus loaded the rules
Port-forward the Prometheus UI and open the Status → Rule health page.
$ kubectl port-forward -n monitoring \
    svc/prometheus-kube-prometheus-prometheus 9090:9090
Open http://localhost:9090/rules?search=druid.
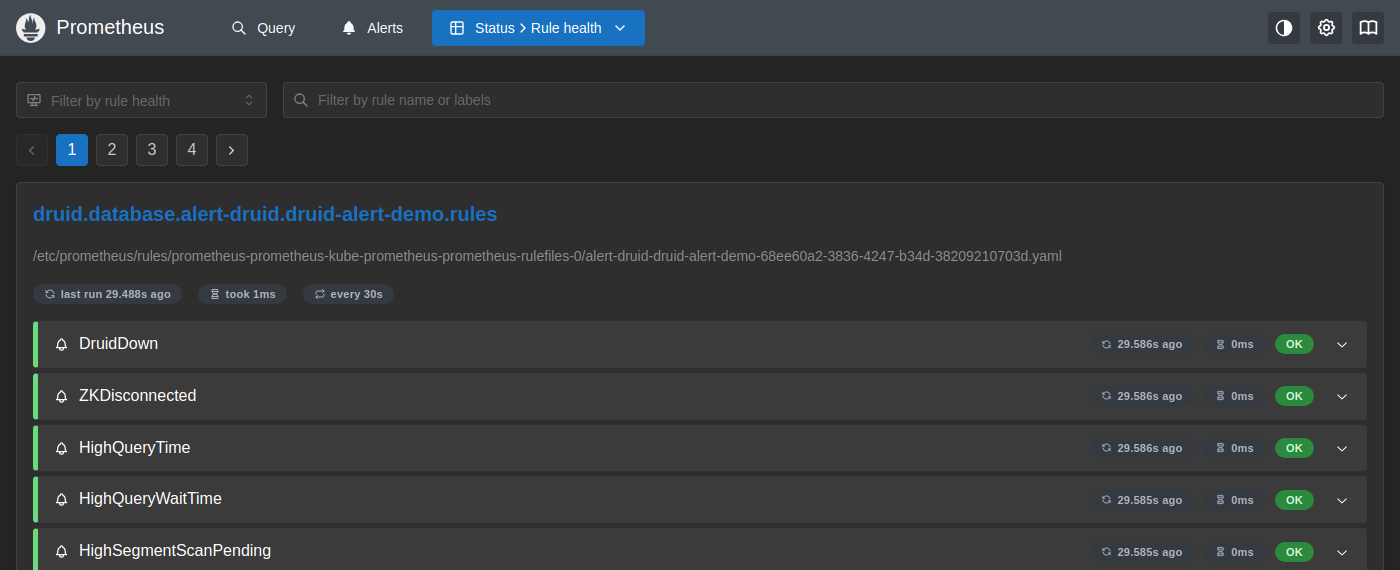
The druid.database.alert-druid.druid-alert-demo.rules and druid.provisioner.alert-druid.druid-alert-demo.rules groups are visible with all rules showing OK, confirming that Prometheus has loaded and is evaluating the Druid alert definitions every 30 seconds.
Step 2 — Install kubedb-grafana-dashboards
The kubedb-grafana-dashboards chart creates GrafanaDashboard CRDs containing pre-built Druid dashboard JSON. A separate controller, grafana-operator, watches these CRDs and pushes the dashboards into Grafana over its HTTP API — both pieces are required. If you’ve already set these up for another database on this cluster (see the Elasticsearch alerting guide for the full walkthrough), skip straight to Install the dashboards below.
Install grafana-operator
If your cluster doesn’t already have it (check with kubectl get crd grafanadashboards.openviz.dev):
$ helm upgrade -i grafana-operator appscode/grafana-operator \
    -n kubeops --create-namespace \
    --version=v2026.6.12 \
    --wait
Mark your Grafana instance as the cluster default
Skip this if you already have a Grafana AppBinding annotated as the cluster default (one is shared across every database). Otherwise:
$ kubectl port-forward -n monitoring svc/prometheus-grafana 3000:80&
$ GRAFANA_PW=$(kubectl get secret -n monitoring prometheus-grafana -o jsonpath='{.data.admin-password}' | base64 -d)
$ curl -s -X POST -H "Content-Type: application/json" -u admin:$GRAFANA_PW \
    http://localhost:3000/api/auth/keys \
    -d '{"name":"kubedb-dashboards","role":"Admin"}'
# Note the returned "key"
$ kill %1
# grafana-appbinding.yaml
apiVersion: v1
kind: Secret
metadata:
  name: grafana-admin-token
  namespace: kubeops
type: Opaque
stringData:
  token: "<api-key-from-above>"
---
apiVersion: appcatalog.appscode.com/v1alpha1
kind: AppBinding
metadata:
  name: grafana
  namespace: kubeops
  annotations:
    monitoring.appscode.com/is-default-grafana: "true"   # must be an ANNOTATION, not a label
spec:
  type: monitoring.appscode.com/grafana
  clientConfig:
    url: "http://prometheus-grafana.monitoring.svc:80"
  secret:
    name: grafana-admin-token
$ kubectl apply -f grafana-appbinding.yaml
Install the dashboards
$ helm repo add appscode https://charts.appscode.com/stable/
$ helm repo update appscode

$ helm template kubedb-grafana-dashboards appscode/kubedb-grafana-dashboards \
    -n kubeops \
    --version=v2026.7.10 \
    --set featureGates.Druid=true \
    --set grafana.url="http://prometheus-grafana.monitoring.svc:80" \
    --set grafana.apikey="<api-key-from-above>" \
  | kubectl apply -n kubeops -f -
Note:
featureGates.<DB>defaults totruefor almost every database in this chart, so onehelm template | kubectl applyinstalls dashboards for many databases at once, not just Druid — this is expected.
Verify dashboards are created
$ kubectl get grafanadashboards -n kubeops | grep druid
NAME                     TITLE                       STATUS    AGE
kubedb-druid-database    KubeDB / Druid / Database   Current   2m
kubedb-druid-pod         KubeDB / Druid / Pod        Current   2m
kubedb-druid-summary     KubeDB / Druid / Summary    Current   2m
Verify End-to-End
1. Check the exporter is running
Every Druid node runs the JMX exporter Java agent, serving metrics on the stats service’s 9104 port. A value of druid_service_heartbeat 1 confirms the node is up and being scraped.
$ kubectl exec -n alert-druid druid-alert-demo-routers-0 -c druid -- \
    wget -qO- localhost:9104/metrics | grep druid_service_heartbeat
druid_service_heartbeat{dataSource="unknown",type="unknown",} 1.0
2. Check the Prometheus target is UP
Prometheus discovers more than 20 scrape pools on a shared cluster, so instead of the Target health page, query up directly for a reliable view.
Open http://localhost:9090/query?g0.expr=up%7Bnamespace%3D%22alert-druid%22%7D&g0.tab=1.
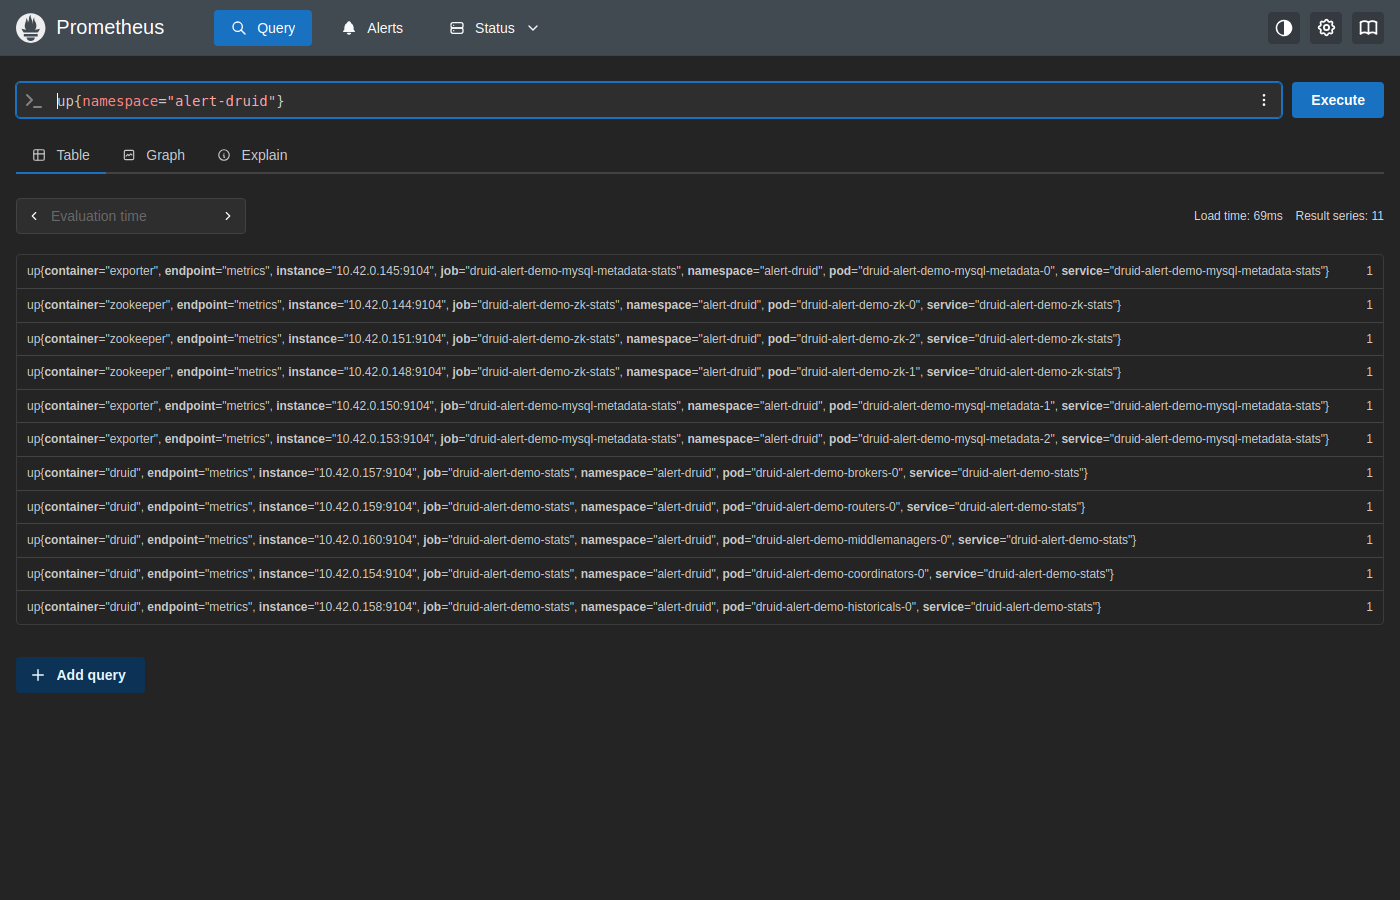
All 11 targets report up == 1 — the 5 Druid nodes plus the 3 auto-provisioned MySQL replicas and 3 ZooKeeper replicas, confirming Prometheus is scraping every component of the cluster.
3. Confirm all Druid alerts are inactive
Open http://localhost:9090/alerts?search=druid to see the Druid alert groups.
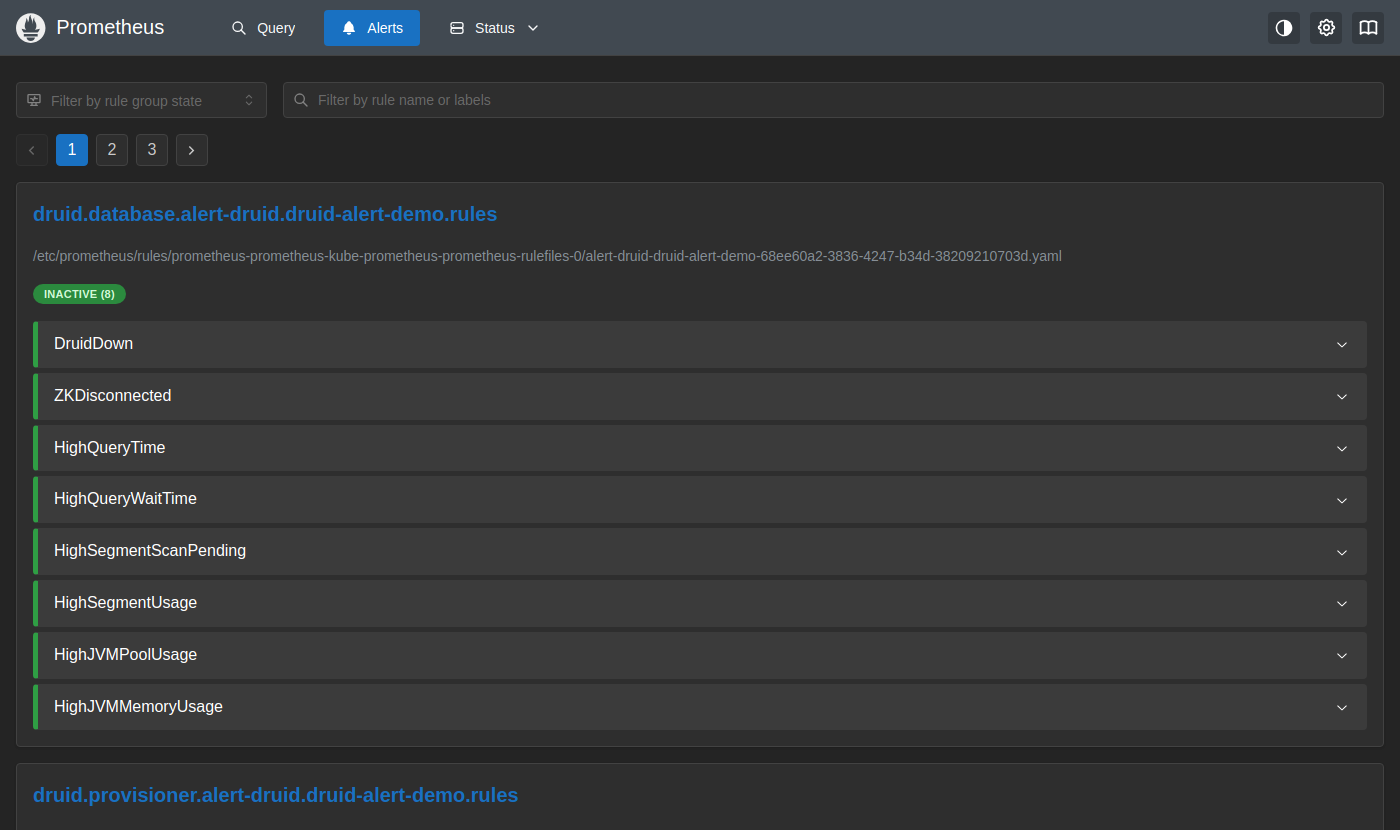
All rules in the druid.database and druid.provisioner groups show INACTIVE, meaning the cluster is healthy and no thresholds are breached.
4. Check AlertManager
Port-forward AlertManager to view any currently firing alerts.
$ kubectl port-forward -n monitoring \
    svc/prometheus-kube-prometheus-alertmanager 9093:9093
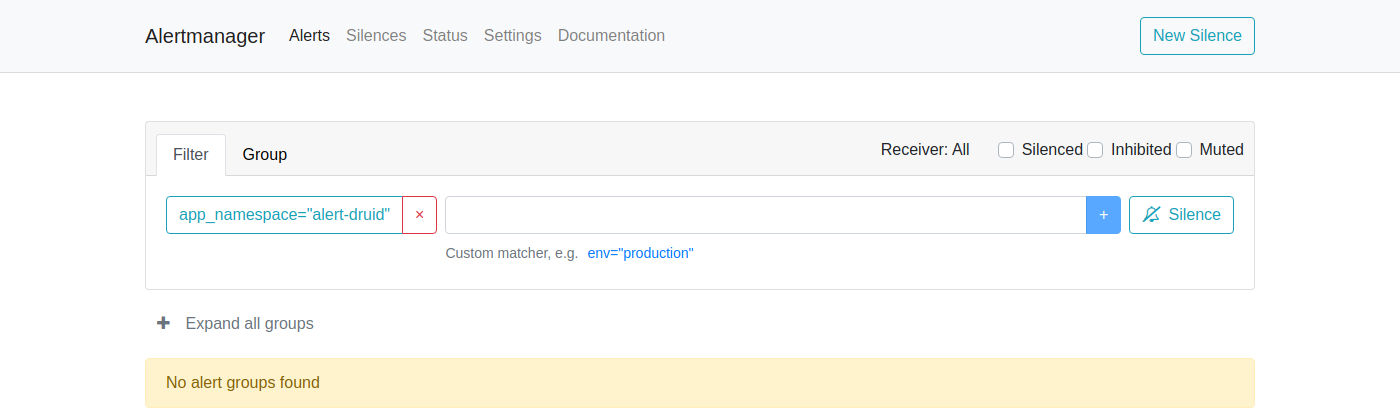
Open http://localhost:9093. With a healthy Druid instance, no alerts for druid-alert-demo will be listed here.
Simulating a Firing Alert
The previous section confirmed that all alerts are INACTIVE while the cluster is healthy. This section deliberately triggers the ZKDisconnected critical alert so you can observe the full alert lifecycle — from firing in Prometheus through to the AlertManager dashboard — and then resolve it.
A note on
DruidDown(and why this tutorial demonstratesZKDisconnectedinstead): every Druid container’sPID 1is the Druid JVM process itself — there’s notini/supervisor wrapper like most other KubeDB images in this project. That meanskubectl exec ... kill -9 1is a guaranteed no-op: confirmed viareadlink /proc/1/ns/pidvs/proc/self/ns/pid(identical —kubectl execshares the container’s own PID namespace), and Linux unconditionally ignoresSIGKILL/SIGSTOPsent to a namespace’s PID 1 from within that same namespace (see the ClickHouse alerting tutorial for the full explanation of this kernel behavior).kubectl delete poddoes work, but Druid’s nodes restart fast enough once their image is cached thatdruid_service_heartbeatnever actually reports0— the metric simply goes briefly absent and comes back as1directly, which can’t satisfyDruidDown’smin(...) == 0condition. Repeatedly force-deleting the same pod for 90+ seconds straight didn’t fire it either.ZKDisconnected, by contrast, is driven by the ratio of connected ZooKeeper sessions across the surviving Druid nodes, which genuinely dips below 1 while ZooKeeper itself is being disrupted — reliably reproducible, and arguably a more realistic incident anyway (ZooKeeper unavailability is a real dependency failure, not an artificial process kill).
1. Disrupt the ZooKeeper ensemble
$ end=$(( $(date +%s) + 90 ))
$ while [ $(date +%s) -lt $end ]; do
    kubectl delete pod -n alert-druid -l app.kubernetes.io/instance=druid-alert-demo-zk --grace-period=0 --force >/dev/null 2>&1
    sleep 3
  done
Run this in the background (or a separate terminal) — repeatedly force-deleting all 3 ZooKeeper pods keeps the ensemble from re-forming quorum for the duration of the loop, which Druid’s nodes report as a drop in ZooKeeper connectivity.
2. Watch the alert fire in Prometheus
Open http://localhost:9090/alerts?search=druid.
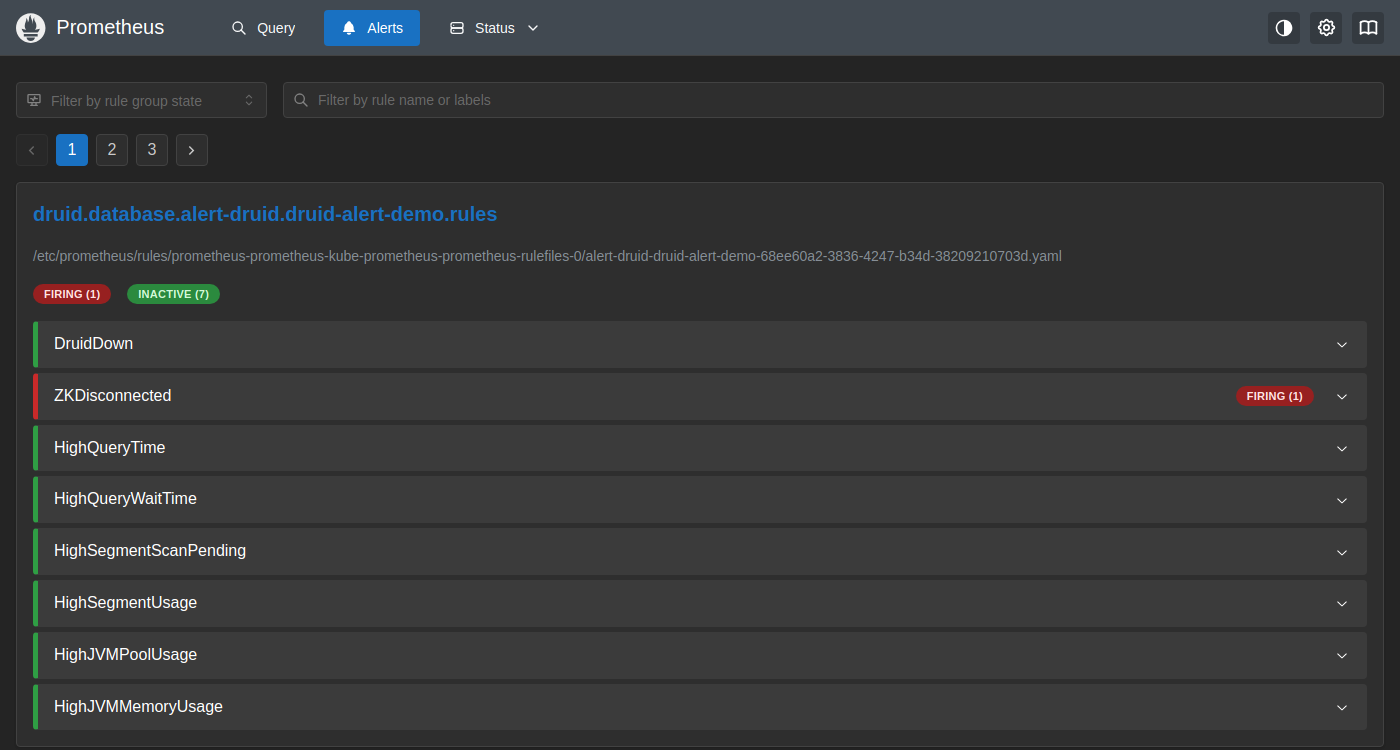
ZKDisconnected transitions from INACTIVE through PENDING to FIRING once the condition holds for the full for: 1m window, while DruidDown and the rest of the druid.database group stay INACTIVE.
3. Check the AlertManager dashboard
Open http://localhost:9093/#/alerts?filter={app_namespace="alert-druid"}.
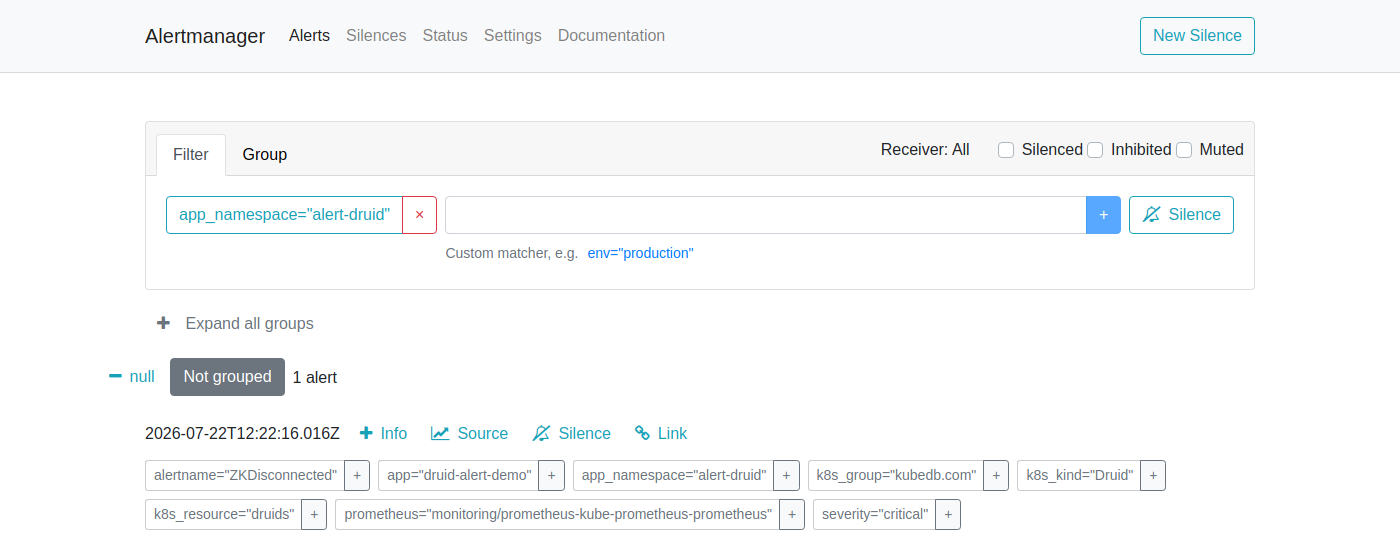
AlertManager shows the ZKDisconnected alert. The alert card displays:
- Severity:
critical - app / app_namespace:
druid-alert-demo/alert-druid - k8s_kind:
Druid - Started: timestamp when the alert first fired
Note: this chart’s alert labels use
app_namespacerather than a plainnamespacelabel — filter or group onapp_namespacewhen searching for these alerts in AlertManager.
AlertManager routes this alert to every receiver configured in your alertmanagerConfig (Slack, email, PagerDuty, webhook, etc.) based on your routing tree. If no receiver is configured, the alert is visible here but silently dropped.
4. Restore ZooKeeper
Let the loop from step 1 finish (or stop it early) — the ZooKeeper PetSet recreates all 3 pods on its own once nothing is deleting them anymore.
$ kubectl get pods -n alert-druid -l app.kubernetes.io/instance=druid-alert-demo-zk
NAME                    READY   STATUS    RESTARTS   AGE
druid-alert-demo-zk-0   1/1     Running   0          6m
druid-alert-demo-zk-1   1/1     Running   0          6m
druid-alert-demo-zk-2   1/1     Running   0          6m
Once all 3 ZooKeeper pods are stably Running and the ensemble has re-formed quorum, Prometheus marks the alert INACTIVE again and AlertManager sends a resolved notification to all receivers. In testing this took a few minutes after the disruption loop ended — ZooKeeper needs to elect a leader and Druid’s nodes need to re-establish sessions, not an instant reconnect.
Alert Reference
All alerts are scoped to the druid-alert-demo instance in the alert-druid namespace via the PromQL label filters service="druid-alert-demo-stats" and namespace="alert-druid".
Database Group
Fired based on live JMX-exporter metrics from the Druid nodes.
| Alert | Severity | For | What It Means |
|---|---|---|---|
DruidDown | critical | 1m | One of the Druid services is down for more than the configured duration. See the caveat above — this only fires if a node reports a live druid_service_heartbeat 0 reading, not when a pod simply disappears. |
ZKDisconnected | critical | 1m | Druid lost connection to ZooKeeper. |
HighQueryTime | warning | 1m | A query took more than 1 second to complete on a historical node. |
HighQueryWaitTime | warning | 1m | Druid spent more than 1 second waiting for a segment to be scanned. |
HighSegmentScanPending | warning | 1m | More than 2 segments are queued waiting to be scanned. |
HighSegmentUsage | critical | 1m | More than 95% of space is used by served segments. |
HighJVMPoolUsage | warning | 30s | More than 95% of a JVM memory pool is being used. |
HighJVMMemoryUsage | critical | 30s | More than 95% of JVM memory is being used. |
Provisioner Group
Monitors the KubeDB operator’s view of the Druid resource phase.
| Alert | Severity | For | What It Means |
|---|---|---|---|
KubeDBDruidPhaseNotReady | critical | 1m | KubeDB marked the Druid resource NotReady — operator cannot reach the cluster. |
KubeDBDruidPhaseCritical | warning | 15m | The instance is in a degraded/critical phase. |
Customising Alerts
To override thresholds or disable specific alert groups, create a custom values file and upgrade the chart.
# custom-alerts.yaml
form:
  alert:
    labels:
      release: prometheus
    groups:
      database:
        enabled: warning
        rules:
          highSegmentUsage:
            enabled: true
            duration: "5m"
            val: 90        # fire at 90% segment usage instead of the default 95%
            severity: warning
      provisioner:
        enabled: "none"    # disable all provisioner alerts
$ helm upgrade druid-alert-demo oci://ghcr.io/appscode-charts/druid-alerts \
    -n alert-druid \
    --version=v2026.7.14 \
    -f custom-alerts.yaml
Cleaning up
To remove all resources created in this tutorial, run the following commands.
# Remove the Grafana dashboards (installed via helm template | kubectl apply, not helm install)
$ helm template kubedb-grafana-dashboards appscode/kubedb-grafana-dashboards \
    -n kubeops \
    --version=v2026.7.10 \
    --set featureGates.Druid=true \
    --set grafana.url="http://prometheus-grafana.monitoring.svc:80" \
    --set grafana.apikey="<api-key>" \
  | kubectl delete -n kubeops -f - --ignore-not-found

# Remove the druid-alerts release
$ helm uninstall druid-alert-demo -n alert-druid

# Remove the Druid instance
$ kubectl delete druid -n alert-druid druid-alert-demo

# Remove the MinIO tenant used for deep storage
$ helm uninstall druid-minio -n alert-druid

# Delete namespace
$ kubectl delete ns alert-druid

# Optional: only if nothing else in the cluster depends on them
$ kubectl delete appbinding -n kubeops grafana
$ kubectl delete secret -n kubeops grafana-admin-token
$ helm uninstall grafana-operator -n kubeops
$ helm uninstall minio-operator -n minio-operator

# Uninstall monitoring stack (optional — skip if other tutorials on this cluster still need them)
$ helm uninstall panopticon -n kubeops
$ helm uninstall prometheus -n monitoring
Next Steps
- Monitor your Druid database with KubeDB using builtin Prometheus.
- Monitor your Druid database with KubeDB using Prometheus operator.
- Detail concepts of DruidVersion object.
- Want to hack on KubeDB? Check our contribution guidelines.